North Shore Basement HydrEpoxy Case Study: Fixing Rising Damp on a Concrete Slab
Case Study by Auckland Waterproofing Experts
What This Case Study Covers
A homeowner on Auckland’s North Shore lifted their old floor coverings during a renovation and discovered a damp concrete slab covered in white salt deposits.
This case study walks through what we found on site, the HydrEpoxy system we specified, how we applied it, and what the homeowner ended up with at the end of the project.
If you’re mid‑renovation on a North Shore property and have just uncovered a similar damp, white‑stained slab, this page is written for you.
What We Found on Site
When the floor coverings came up, the slab showed classic signs of active moisture movement. Specifically, we found swirling white efflorescence deposits across the full floor area. The concrete masonry block walls below window height were equally damp and porous.
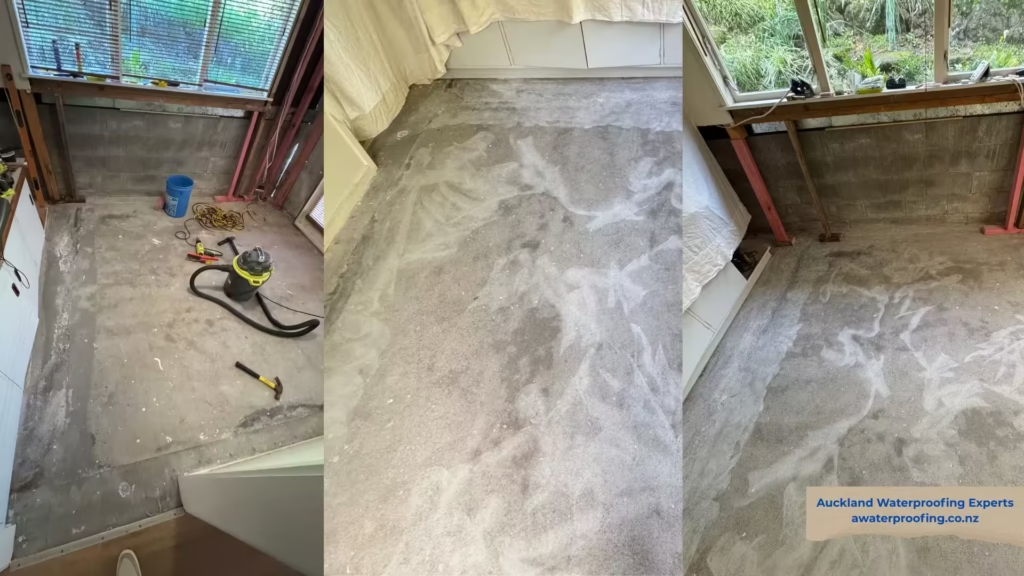
On North Shore hillside sections, cut-and-fill construction often places ground floors at or below the original ground level. This is common in suburbs like Birkenhead, Northcote, Glenfield, Hillcrest, Albany, and Devonport. As a result, saturated soil banks against the slab and lower walls. Over time, that creates sustained hydrostatic pressure. Standard sealers are simply not designed to resist this kind of sustained force.
For a broader overview of how basements behave in Auckland conditions, see our guide to basement renovations in Auckland.
The Waterproofing System We Specified
We specified HydrEpoxy (ARDEX WPM 300) as our negative‑side waterproofing system for this North Shore concrete slab.clearpond+3
We chose HydrEpoxy because:
- It bonds to damp and “green” concrete without needing the slab to be fully dry first.
- It carries a 250 kPa hydrostatic pressure rating (equivalent to 25 metres of water head) when applied at the specified film thickness.
- We apply it entirely from inside the room, with no excavation required — ideal for mid-renovation projects.
You can read more about HydrEpoxy in our main service page, HydrEpoxy basement waterproofing Auckland, and in the official ARDEX WPM 300 HydrEpoxy datasheet.
How We Applied It
Free Site Visit and Moisture Diagnosis
Before ordering any product, we completed a free site visit to:
- Confirm the moisture source and movement pattern.
- Assess the full extent of the affected slab and lower wall area.
- Check that the concrete and blockwork suited direct membrane application.
The assessment confirmed rising damp through the slab and lateral moisture ingress through the lower block wall faces, with no structural cracking that required repair before waterproofing.
If you’re at this stage yourself, our team offers free site inspections for below‑ground waterproofing in Auckland.
Substrate Preparation
We treated preparation as the make‑or‑break step:
- We mechanically ground the slab to remove all adhesive residue, dust, laitance, and efflorescence — exposing clean concrete pores for the epoxy to bond to.
- We high-pressure cleaned the block wall faces at a minimum nozzle pressure of 14 MPa to strip contaminants and open up the surface.
No membrane — regardless of brand or rating — will perform correctly over a contaminated or poorly prepared substrate. For more on why prep matters, see our concrete waterproofing guide for Auckland.
First Coat and Mesh Reinforcement
HydrEpoxy is a two‑component water‑based epoxy, mixed at a 1:1 ratio by volume.lookfloors+1
On this project:
- We blended the two components with a spiral paddle mixer at low speed to achieve a uniform mix without entrapping excess air.
- We applied the first coat to the slab by squeegee and long-nap roller, working it firmly into the surface at a coverage rate of approximately 3 m² per litre.
We then embedded fibreglass reinforcing mesh into the wet first coat at all floor-to-wall junctions, corners, and construction joints. These are the areas most prone to differential movement and the most common starting points for membrane failure.
For garages with similar slab and wall issues, we follow a comparable process outlined in our HydrEpoxy garage waterproofing page.
Second Coat — Full Membrane Thickness
After a minimum 4‑hour re-coat interval, we applied the second coat at the same coverage rate. This brought the total dry film thickness to around 300 micrometres across the full treated surface, in line with ARDEX specification for negative‑side moisture control.
7‑Day Cure
We observed a full 7-day cure before the homeowner installed any wall linings, floor adhesives, or floor coverings. Applying finishes before full cure can cause bond failure or delamination. Therefore, we enforce this curing window on every HydrEpoxy installation.
For more context on best‑practice below‑ground waterproofing sequences, see our below‑ground tanking guide for Auckland.
The Result
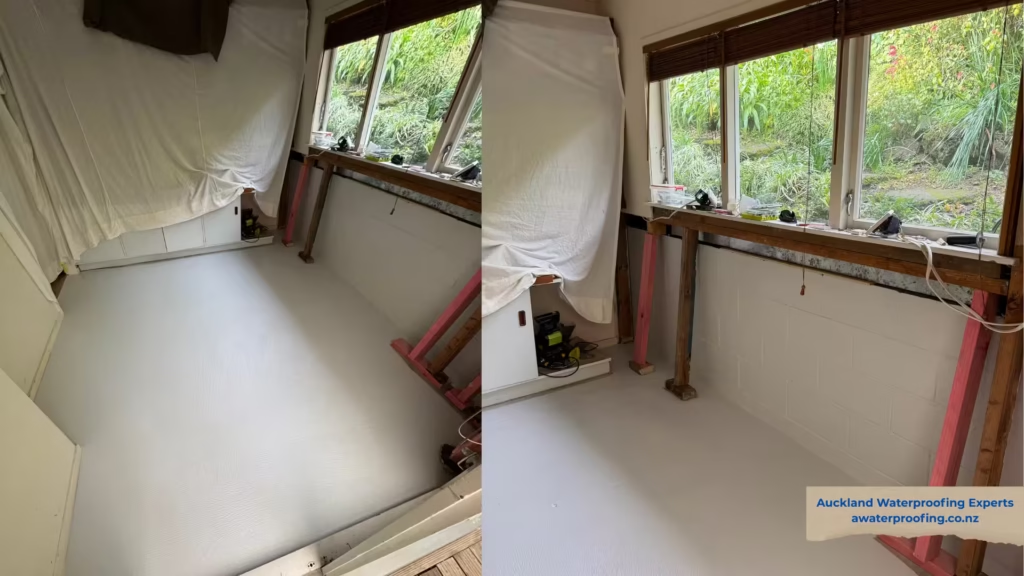
We protected the slab and lower walls at substrate level, not just cosmetically. As a result, the homeowner proceeded with their full interior renovation — new wall linings, flooring, and fit-out. They knew we had genuinely resolved the moisture problem, not simply hidden it.
If you’re planning a full basement fit‑out, our basement renovations guide walks through methods, costs, and consent requirements in more detail.
What Was Delivered
- Full two‑coat HydrEpoxy membrane across the slab and lower wall faces.
- Fibreglass mesh reinforcement at all corners, junctions, and critical transitions.
- 250 kPa negative‑side hydrostatic pressure resistance — achieved without any exterior excavation.
- 10‑year product guarantee on ARDEX materials (per manufacturer terms).
- 5‑year Auckland Waterproofing Experts workmanship warranty on the installation.
- Full photographic record — before, during, and after — for the homeowner’s files and inspector sign‑off.
For broader waterproofing options across basements, foundations, and retaining walls, see our below‑ground waterproofing and tanking overview.
Common Questions
Do I need to treat the whole floor, or just the damp patches?
You should treat the whole floor. Waterproofing only the visibly damp areas leaves untreated sections acting as active pathways; moisture will reroute and pressure will concentrate at the boundary of the treated area, which can cause the membrane edges to lift or fail over time.
Our HydrEpoxy basement waterproofing page explains why full‑area coverage is part of the standard specification, not an upsell.
Will this fix the problem permanently?
HydrEpoxy permanently addresses moisture ingress through the slab and lower block faces, provided:
- The membrane covers the full affected area.
- The substrate is correctly prepared and application follows ARDEX specification.ardex+1
It does not change the underlying hydrology of the site. On properties with severe groundwater problems, additional below‑ground drainage and tanking may be recommended to work alongside the internal system.
External technical resources like Sika’s below‑grade waterproofing overview can also help you understand how internal and external systems work together.
Does this need a building consent?
Internal negative‑side waterproofing as part of a renovation does not usually require its own separate building consent. The PS3 Producer Statement we supply supports the inspector’s sign‑off on the completed floor substrate as part of the broader consented renovation work and aligns with NZBC expectations for membrane work by LBP‑certified applicators.
Our below‑ground waterproofing guide and basement renovations guide both include more detail on consent triggers in Auckland.
What happens to floor height?
A two‑coat HydrEpoxy application adds approximately 0.3 mm to the slab surface. This increase is negligible for almost all floor finish transitions, including carpet, vinyl, timber, and laminate.
For renovation planning and finish choices, our concrete waterproofing Auckland page gives indicative costs and considerations.
Can renovation work continue elsewhere in the house?
Yes. HydrEpoxy is water‑based and low odour, so the treated room simply needs ventilation and restricted access during application and the 7‑day cure period, while the rest of the property remains fully usable.
If your project includes decks, roofs, or external areas as well as basements, you can explore our deck waterproofing and roof waterproofing services to keep the whole envelope dry.
Facing the Same Problem on Your North Shore Renovation?
If you’ve stripped back a North Shore ground floor and found damp concrete or white salt deposits, you’re actually in a strong position: the slab is exposed and your renovation budget is already active.
A single HydrEpoxy treatment:
- Resolves the moisture issue at substrate level before new linings and finishes go in.
- Costs far less than stripping out a completed room later to deal with a hidden slab problem.awaterproofing+1
We provide a written fixed‑price quote, usually within 24 hours of the free site visit.
Auckland Waterproofing Experts — ARDEX‑certified LBP applicators. North Shore specialists. Free site visits across all Auckland suburbs.
Same problem, different job — a note for agents listing a Shore house